PNGuin — iPhone screenshots from the menu bar
For quite a while now, every screenshot of my iPhone went through a little shell script called iphone-screenshot. I need that a lot these days, because an AI agent that builds an iOS app should be able to look at what it just built, and “take a screenshot of my iPhone and have a look” has become one of the most frequent sentences in my terminal. The script itself was trivial. What it stood on wasn’t: a pymobiledevice3 tunneld running as a root LaunchDaemon, since you can’t talk to a modern device’s developer services without a tunnel.
That daemon had a habit. Once a phone told it that it “has not been unlocked recently”, it kept answering {} — forever, silently — and the only cure was sudo. You can imagine what that does to an agent that wants to check its work every couple of minutes. sigh
Xcode 27 finally ships xcrun devicectl device capture screenshot: no tunnel daemon, no root, no Python, about 0.7 seconds per shot. So I threw the old script away and wrote PNGuin, which is the same iphone-screenshot command (now in Swift) plus a menu-bar app around it. Say “penguin”: it delivers PNGs, and if you spot a nod to an old friend from the Linux days in there, you’re not wrong. As usual these days, with AI doing most of the typing.
Two front ends, one core
The CLI is made for scripts and agents. On success, stdout carries nothing but the path of the PNG; the exit codes tell the caller what to do next. 4 means the phone is locked, so ask the human to unlock it. 3 means there’s no clear candidate, so run iphone-screenshot list and ask which device is meant. That’s really all an agent needs, and I’m surprised how much nicer a tool gets when you design it for a reader that doesn’t guess.
The menu-bar app is for me. Click the icon and the panel lists every paired iPhone and iPad with its state (ready, locked, not reachable), shows a live preview of the selected one and saves a screenshot to the desktop with one click. Click the preview and it’s on the clipboard; drag it into Mail, a chat or a Finder window and it arrives as a properly named PNG. Rows are ordered by the device you last took something from, because that’s the one you’ll want again.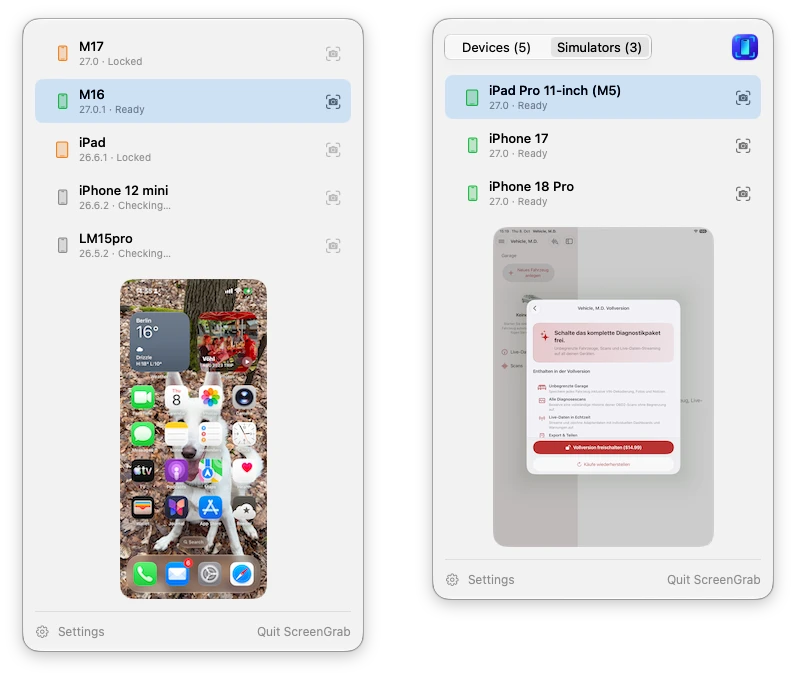
devicectl, the fine print
Of course it wasn’t quite as easy as calling devicectl. A few things I learned along the way:
devicectl list deviceslists every paired device, whether it’s lying on the desk or in a drawer three rooms away, and itstunnelStateonly tells you which tunnel was used last. To find out whether a phone can actually be captured, PNGuin asks each one for its lock state.- Don’t ask them all at once! Probing five paired devices in parallel works exactly once. From the second round on, CoreDevice wedges for everyone, and the iPhone that delivered a perfectly fine preview a second ago suddenly reports itself as unreachable. One at a time, selected device first, and the problem’s gone. It took a couple of stress-test runs before I believed it.
- My displays all run at 1x — yes, dear reader, I’m still one of those, with an LG ultrawide and two Dells in portrait mode — so a 1206×2622 screenshot shrinks to about 150×320 physical pixels in the panel. SwiftUI’s own downscaling turned that into colourful mush. I was convinced that no amount of resampling would make six-pixel text readable, and Codex, which I asked for a second opinion, called better interpolation “useful polish”. A quick Lanczos test proved us both wrong: same size, and suddenly “CAN 11B (500K)” was legible again.
Simulators, too
Once the panel existed, the obvious question was: why only real devices? Most of my screenshots for App Store pages, documentation and this blog come from the simulator anyway. Xcode has its own ways to grab those, but I wanted them in the same place as everything else, with the same click to copy. So there’s now a segmented control at the top, Devices and Simulators, the latter listing every booted iPhone and iPad simulator via simctl.
And since a simulator lets you cheat, PNGuin cheats with style. It can put the classic marketing status bar on the simulator (9:41, full bars, full battery) while it’s previewed and remove it again afterwards; if you’ve set status-bar overrides of your own, it keeps its hands off them. It can also give the screenshot transparent rounded corners, which is what you want for slides and docs. Both options apply to the preview as well, so whatever you drag out is exactly what you would have saved.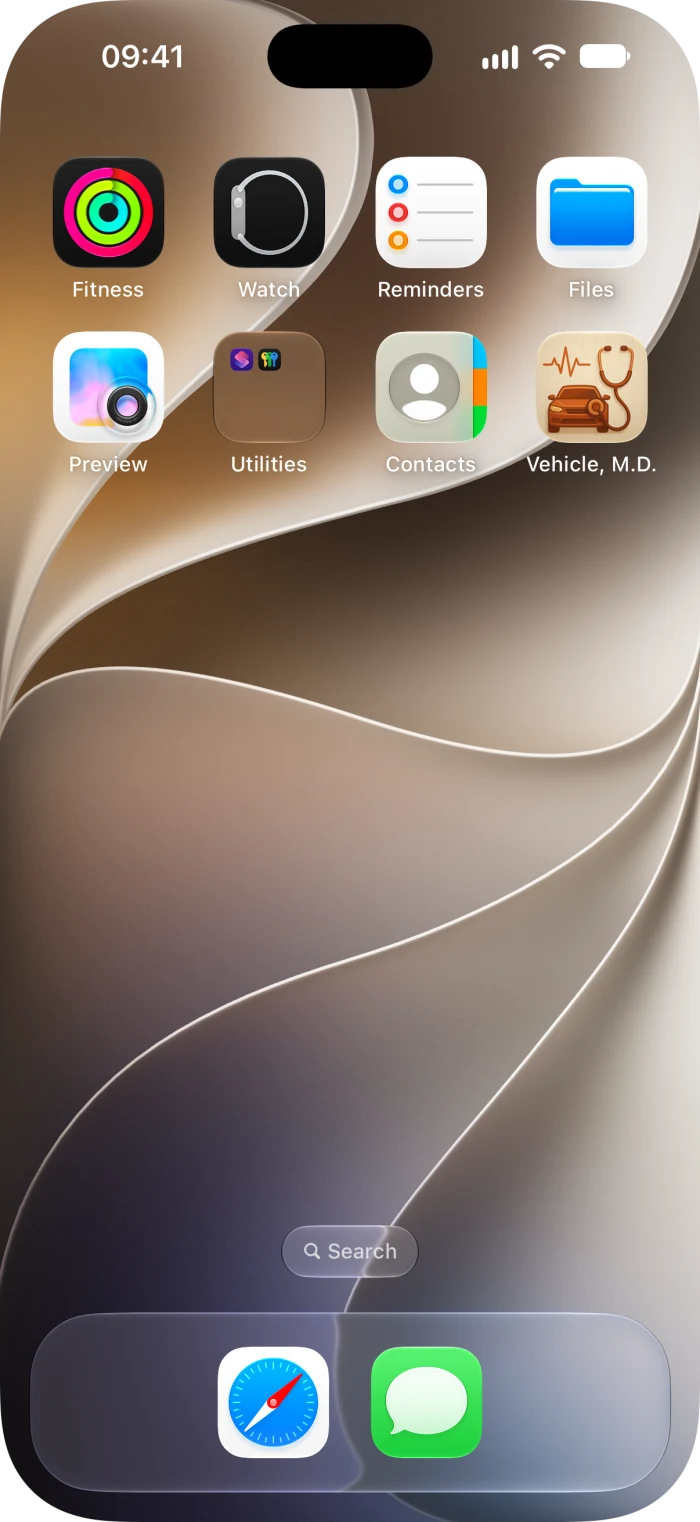
One more gotcha for the collection: a screenshot of a simulator that has just been shut down doesn’t fail. It hangs, for a full minute. PNGuin therefore gives simctl a ten-second timeout. Thanks, Apple :)
PNGuin belongs in the same drawer as Simsalabim, the toolkit that gives the iOS Simulator Bluetooth, cameras and NFC: small tools that each remove one specific annoyance from iOS development, and which I’d never have justified building a few years ago.
Getting it
The CLI is on Homebrew:
brew tap mickeyl/formulae
brew install iphone-screenshot

iphone-screenshot                                    # the only ready device, saved to ~/Desktop
iphone-screenshot --device "My iPhone"               # by name or UDID
iphone-screenshot --simulator --clean-status-bar --mask-corners
iphone-screenshot list                               # name, udid, state, OS version
For now, the menu-bar app builds from source (make install, with Xcode 27, XcodeGen and Shark installed). Everything is MIT-licensed and on GitHub.
If you read this post in its first hours: the app was called ScreenGrab back then, until I noticed that fastlane already has a screengrab, and that a family with Simsalabim, ImpossiBLE and NFCromancer in it deserves a better pun. The old links still work.
If you’re teaching your own agent to look at your phone, I’d love to hear how you use it. Cheers, :M: